A Job allows the on-demand or on-schedule data loading of one or more data warehouse tables and/or running scripts in a certain order.
For instance, a Job loads sales and CRM tables, and refreshes the Sales Tableau Extract overnight; another Job refreshes GL tables and the Financials Tableau Extract every hour.
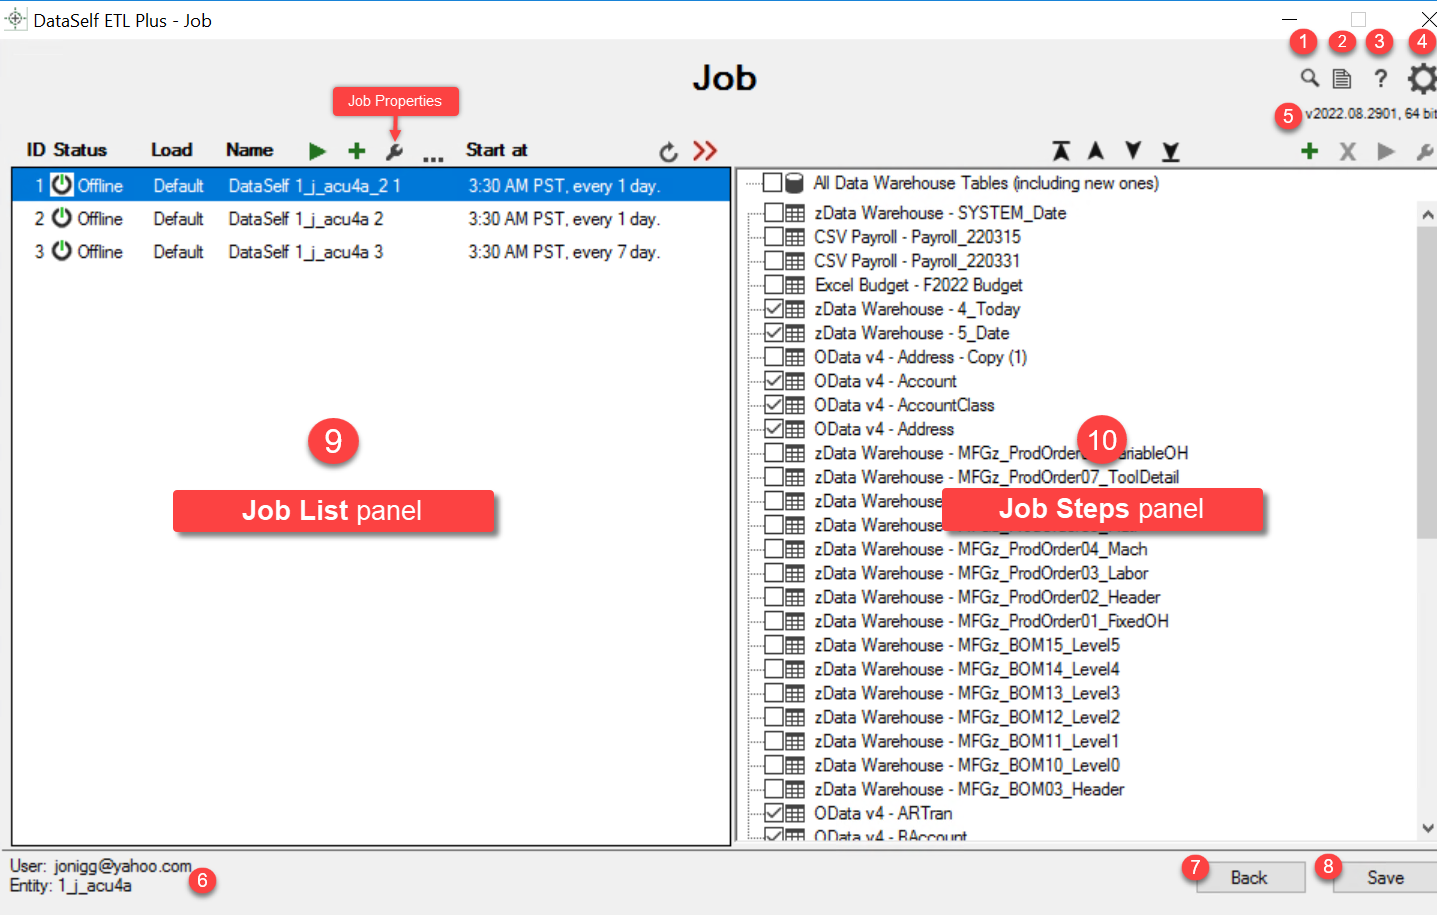
Jobs are shown in the Job List panel and the Job’s steps are shown in the Job Steps Panel.
The Job Properties panel shows job scheduling and more job configurations.
The Job page is accessible from ETL+ Extract, Transform and Load (ETL) Page .
| Anchor | ||||
|---|---|---|---|---|
|

Find
 . Click to open the search box. (shortcut:
 Ctrl + F) Search box opened by Find .
Log
 . Opens the ETL Logpage. (shortcut
 Ctrl + G)
ETL+ Working Files  . Opens file location of ETL+ log files.
Help
 . Click to open documentation for this ETL+ page in a web browser (shortcut
 F1)Settings
 . Click to open the Settings page.
Version number: format:
vYYYY.MM.DDBB.Example:
v2022.08.2901means the 1st build on 08/29/2022.
ETL+ User name for the current session.
Back. Click to close this page and go back to the ETL page.
To close without saving changes click Back and click Yes to theLeave without saving?prompt.Save. Click to save changes (shortcut
Ctrl + S).An asterisk indicates there are unsaved changes.


Job Properties  . Click to open theJob Properties panel.
| Anchor | ||||
|---|---|---|---|---|
|
The job list panel is on the left hand side of the Job page.

Columns
ID: Job ID. Assigned by ETL+. Use this ID when running the job from a Window command line or shortcut.
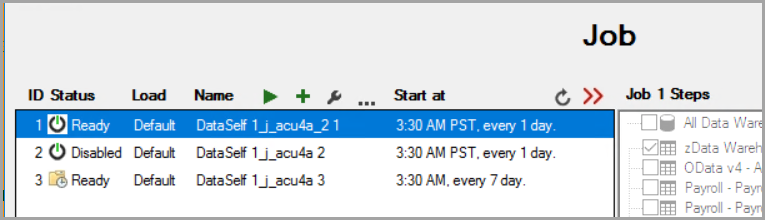
Status. See Job Properties panel.
App Icon: Which App (DataSelf Agent or Windows Task Scheduler) has been assigned to run the Job on a schedule (if configured).
Agent Status: Offline, Ready, Running, Stopping, Disabled.
Load. Shows the setting of the Load type selected in the Job Properties panel.
Default: Uses the Load Type configuration on the ETL+ main page.
Forced Load All: Forces the job’s data warehouse tables to Load All.
Example: A Job executes the default delta load of a table every hour, and another Job executes a Load All on this table overnight.
Load type (Job Properties panel) and the “column mappings modified” prompt sets this condition. Learn more at Job → Forced Load All.
Name. Job’s name. Double-click on a name to edit it (or use shortcut F2). By default:
The Job name is: DataSelf <entity-id> #<job-id>
When creating WTS tasks via ETL+, the task is named with this name.
When creating Windows shortcuts via ETL+, the shortcut is named with this name.
| Anchor | ||||
|---|---|---|---|---|
|

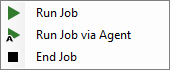
Run Job
 : Opens the job menu:
 Run Job: Run the Job now from this ETL+ session.
Run Job via Agent: Run the Job via the Agent assigned to run this Job.
Add Job
 . Adds a new job in the panel with a new ID and Name.
 Job Properties . Opens Job Properties panel.
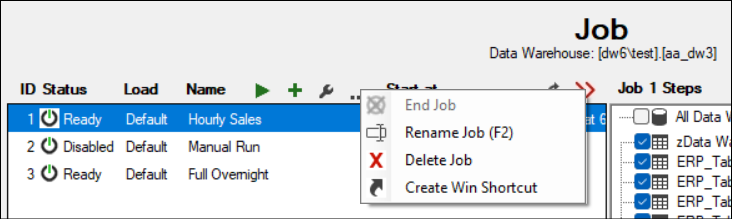
 More Actions:
 End Job. Stops the job on the selected row if it is currently running.
Rename Job (or shortcut F2).
Delete Job.
Create Win Shortcut. Creates a Windows Shortcut to execute the job. Creates the shortcut in the Windows folder where ETL+ is installed. Learn more at: ETL+ Command Line Interface
Start at. Summary of when the Job is scheduled to run.
Refresh Job Status
 . Reloads/refreshes information on the Job List panel.
Expanded Job List Panel 
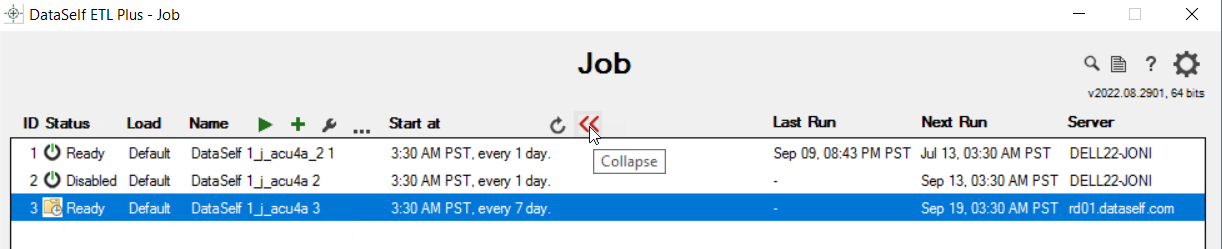
Expand / Collapse  . Click Expand to view additional Job List columns:
Last Run. Date-time of the last run.
Next Run. Date-time of next scheduled run.
Server. The
MS Windows Server Namewhere the Job App is running (if applicable).
| Anchor | ||||
|---|---|---|---|---|
|
Defines the steps for each job, including ETL+ Objects, and the maintenance of the following scripts: Tableau Extracts Refresh, Command Line, and Cloud Script.
This panel lists the steps, in the order of execution, that belong to the selected job on the Job List panel to the left. In other words, running a job from the Job List panel will execute the checked step in the Job Steps panel in the listed order.
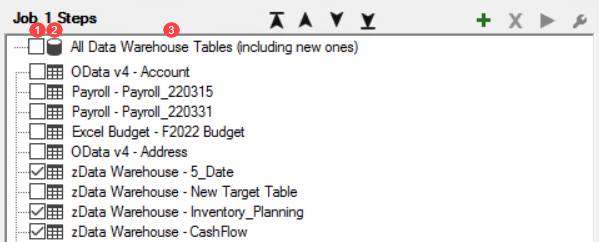

Step Checkboxes: Use the checkboxes to select the objects that will be executed by the job in the Job List panel.
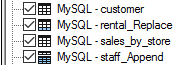
Object Type. The icon indicates the type of object in the row.
Object Name: Lists the names of each ETL+ object.
Move Buttons 
Move to Top or Move to Bottom. Changes the order of execution of the steps. Select a step and click to move it to the top or bottom of the list.
Move Up or Move Down. Select a step and click to move the step up or down one row.
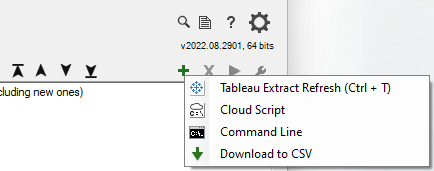
Script Buttons 
Add Script
 . Opens the script menu.
Select one of the menu options and follow the prompts. For more see Type of Job Steps below.
Delete Script
 . Select a step and click Delete Script to delete it.
Run Script
 . Select a step and click Run Script to execute it.
Script Properties
 .Select a step and click to change it’s properties.
For more see Type of Job Steps below.
| Anchor | ||||
|---|---|---|---|---|
|
The steps in the Job Steps panel can be a target table in the data warehouse, a Tableau Extract Refresh job, a Command Line (may run a local script), Cloud Script, or a Download to CSV process.
Data Warehouse Tables
Target tables taken from the ETL+ Target Objects Panel.
Command Line Script 
Runs a command line script on the computer where ETL+ is running.

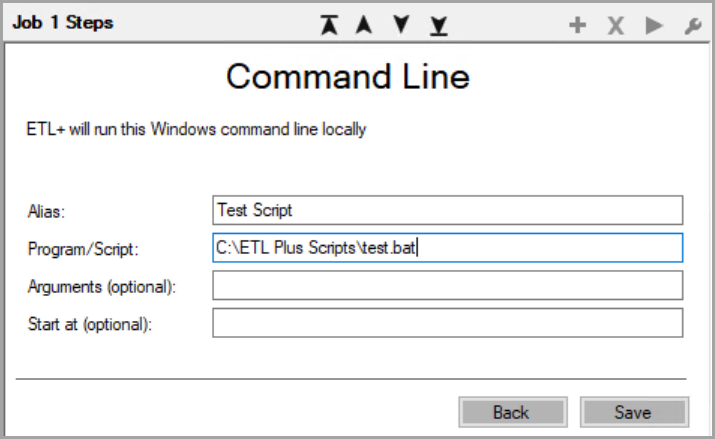
Alias. Name of command line job step.
Program/Script. The script to run as a Windows Command Line (such as C:\MyFolder\MyScript.bat).
Arguments (optional). Arguments (parameters) to the command line.
For more see Passing Arguments to Command Line Scripts in ETL+Start at (optional). Folder to run the script (usually not needed).
Cloud Script 
Runs a DataSelf Cloud Script (typically for running Tableau, Python and other data extractions or Automatic Distribution scripts). Contact DataSelf to discuss.
Name. Last part of the
<ScriptName>on the DataSelf ETL+ Server.
Also the name of the job step.
When triggered, this job step runs the following on the Dataself cloud server dw3
| Panel | ||
|---|---|---|
| ||
“C:\DataSelf\CloudScript\<EntityID>_ |
Download to CSV
Downloads the data with the selected step into a .CSV file.
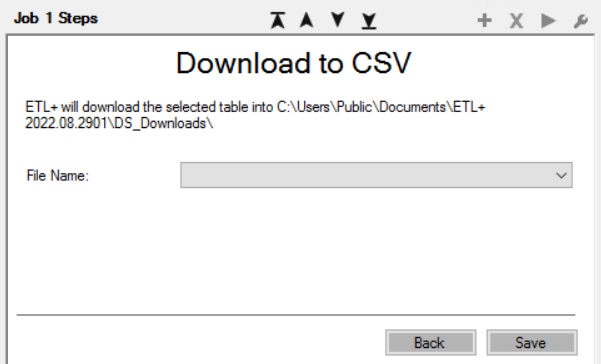
ETL+ assigns the Windows folder the file will download into.
Tableau Extract Refresh
Allows the refresh of Tableau Extracts directly from ETL+ either manually or as part of Jobs.
Currently, this feature only works when the Tableau Server and the data warehouse are hosted by DataSelf.
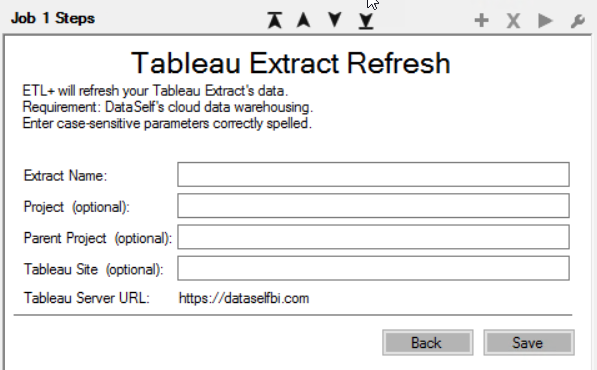
Extract Name. Name of an existing Tableau Extract.
Project fields: by default, your Tableau Extracts come pre-loaded to the Tableau Project (Location) = <ETL+ EntityID>. Use the following URL to find your Tableau extracts and their location (Project): https://www.dataselfbi.com/#/site/<ETL+ EntityID>/datasources?order=name:asc replace <ETL+ Entity> with that value.
Project (optional). Leave blank if the data source is stored in the Tableau Project with the same name as <ETL+ EntityID>. Otherwise, enter the Tableau Project name where the data source is stored.
Parent Project (optional). Leave blank if data sources are NOT stored in a Tableau sub-project. Otherwise, enter the name of the parent project.
Tableau Site (optional). Leave blank if your Tableau site = <ETL+ EntityID>.
This version assumes the Tableau Extracts are at:
Production: https://dataselfbi.com
NFR licenses: https://bi1.dataself.com
Tableau Extract Refresh When Tableau is Hosted in a Private-cloud, On-premise or Online
Use a Command Line script (see above) to run a Windows script that refreshes your extract in sync with table loads.
Visit the following page for Tableau syntax to be used in your batch files:
https://help.tableau.com/current/pro/desktop/en-us/extracting_TDE.htm
Example:
tableau refreshextract -s https://tlb.com -u doe -p "abc" --datasource "TdsName"Anchor JobPropertiesPanel JobPropertiesPanel
Job Properties
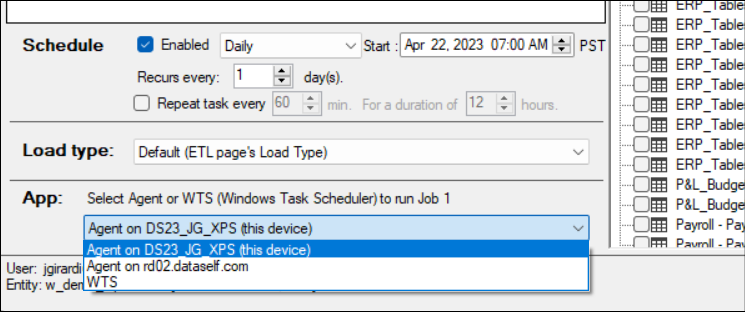
The Job Properties panel allows the configuration of a Job’s schedule, the Load Type of its data warehouse tables, and what App (application) runs the schedule.
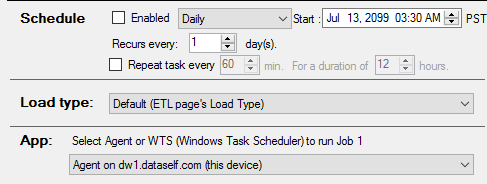
Schedule. Enter the parameters to define if and how often the Job should run a schedule.
| Anchor | ||||
|---|---|---|---|---|
|

Default (ETL page’s Load Type). The Job’s tables will be loaded using the Load Type from the ETL SQL Statement Panel.
Force Load All. Forces the Job’s tables to load with the Load All Load type, overriding the Load type selected in the Load Panel on the ETL+ Extract, Transform and Load (ETL) Page.
Learn more at Force Load All, ETL+ Table Load Types
Force Replace when Upsert, default for others: Forces the Job’s tables to load with the Replace load type only for tables with Upsert selected in the Load Panel on the ETL+ Extract, Transform and Load (ETL) Page.
For these tables, you must configure the Replace filter correctly, for instance: CreateDate>=Max(CreateDate). This filter is always different than the one used in Upsert. After you configure the Replace filter, switch back to Upsert and save it.
Contrast with the Force Load All option above.
App: Selects either DataSelf Agent or WTS as the scheduler used to run the ETL+ job.
DataSelf Agent (Recommended): ETL+ Agent (DataSelf Agent) provides a secure, easy, and powerful method to run Job schedules. It also provides remote ETL+ Job management:
Changes to Job properties become effective immediately, for instance, changing the schedule, load type, and which Agent runs a schedule.
Running or stopping a Job on demand.
Windows Task Scheduler (WTS): This allows users to create/overwrite WTS tasks to run ETL+ Jobs.
Once a WTS Job task is created on a server, changes to its schedule can only be done by overwriting the task via ETL+ or changing the schedule directly in WTS.
WTS tasks running ETL+ jobs can also be maintained directly in WTS.
Use this option if you want to run ETL+ Jobs with other scheduling apps such as MS SQL Agent.
| Panel | ||||||||
|---|---|---|---|---|---|---|---|---|
| ||||||||
To schedule or run jobs by other means see Passing Arguments to Command Line Scripts in ETL+ . |
App Setup for new ETL+ Installations
Case 1: The ETL+ installation will NOT run scheduled Jobs: There’s no need to set up the App.
Case 2: The ETL+ installation will run scheduled Jobs.
Recommended App: ETL+ Agent
Select
Agent on YourDeviceName (this device)on the dropdown list.Click Save.
Alternative App: WTS
To run this procedure, you need to close ETL+ and re-run it with “Run as Admin” from Windows Explorer, directory C:\Program Files\DataSelf ETL Plus\.
Go to the Job page, select the desired Job to schedule on the Job List, and click the Properties icon.
Select
WTSon the dropdown list.Configure the Schedule portion as desired.
Enter a Windows Admin credential on the right panel. Be sure this user has the password set to “Never expire” (preferably, not a user’s account, but an account to run Windows services).
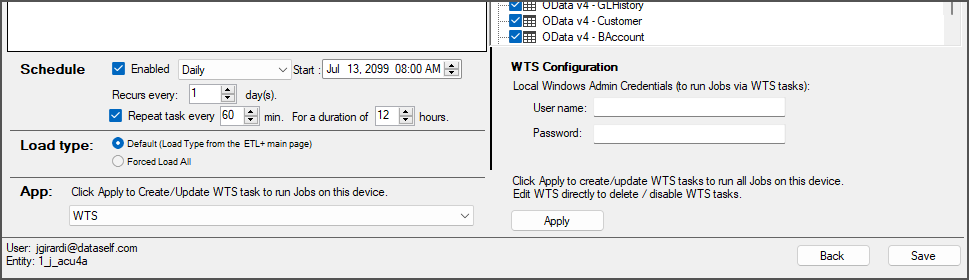
Click
Apply.Confirm if you receive Windows Security Account prompts.
Access this ETL+ page (window) from ETL+ Extract, Transform and Load (ETL) Page
Related Pages
ETL+ Command Line Interface The command line interface executes a job defined on the Job page.
v2023.07 ✅ v2023.10.1905 (wip)
| Excerpt | ||||
|---|---|---|---|---|
| ||||
Hidden – if these screenshots are not displayed then please save for future reference 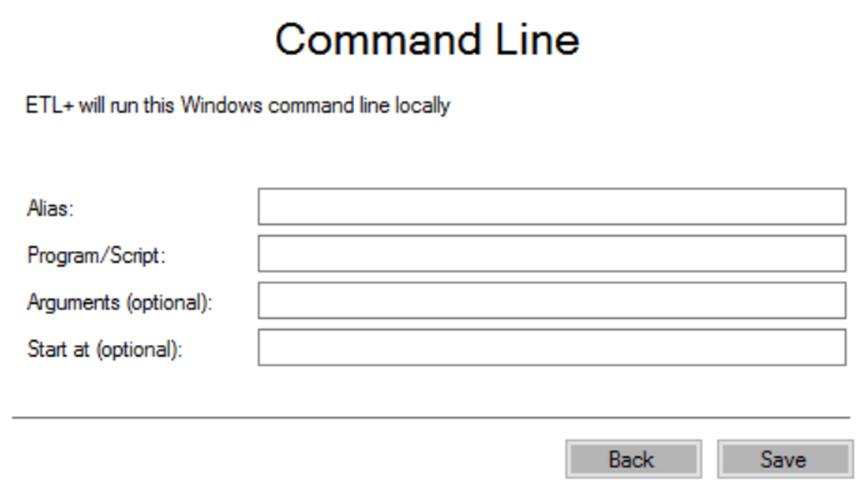 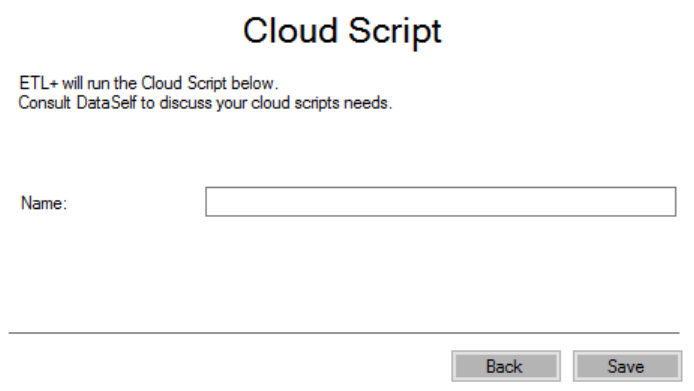 |