ETL+ Issues Importing from a CSV, Text file
Installation Checklist
Connecting to CSV and Text Files
Currently, these must be comma delimited text files, with the first row with Column headers.
If you haven’t installed ETL+ yet: ETL+ Deployment Instructions.
Login to ETL+ (help here).
Adding a new text file: On ETL page’s left panel, click
Add Source->Text (*.txt, *.csv).Maintaining a text source: On ETL page’s left panel, right-click the text source →
Properties.On the
Text Filepage:The
Aliasbox will be automatically populated, but you can customize it.File Path: Enter a local text file or useBrowseto find it, or type in its internet URL address.Supported Excel formats: TXT, CSV.
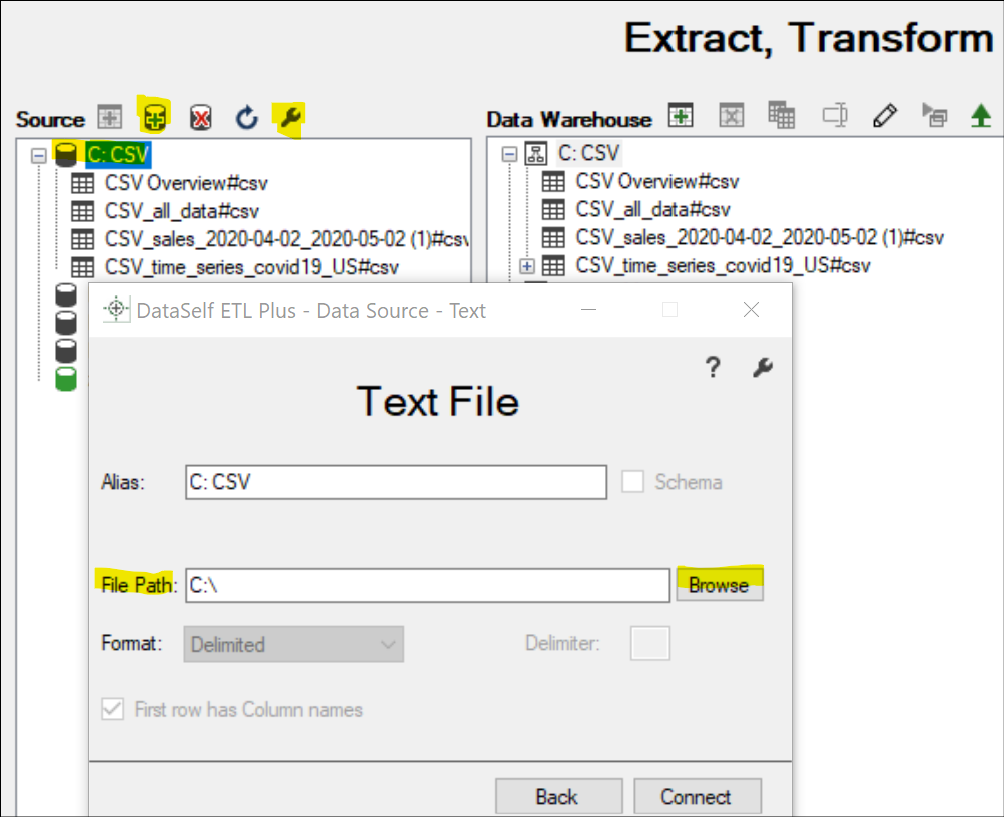
Click
Connect.
You’ll get back to the ETL page and see tables under the selected text source on the left panel.
Mapping and Loading Tables
To view tables available from a text source on the left panel, right-click the text source →
Refresh.To map a text table to the data warehouse,
double-click its nameon the left panel, or right-click on it →Add Table.You’ll now see the table added/mapped to the center panel.
To preview its data, right-click the table on the center panel →
Preview.To load its data to the data warehouse, right-click the table on the center panel →
Load Now.Click the
Logicon (top right) to view data load results. Log page help here.
Schedule the Data Load
On the ETL main page, click
Refresh Batch(top right icon on the center panel).Select a Refresh Batch or create a new one to load your text data on a schedule (help here) → on the right panel, be sure the text tables to load have their boxes checked and in the desired load order.
To load them now, click the
Refresh Batch Now(play icon) on the left panel for the desired Refresh Batch.To schedule the data load:
Click
WTS Settings-> enter the WTS parameters →Apply.This step might require you to run ETL+ app as “Run as administrator” in Windows.
Click
Close->Close.
Testing
After ETL+ has loaded your text files, this is to check if the data extraction process finished successfully and row count per extracted table matches with your text tables.
Steps
Login to ETL+ (help here).
On the ETL main page, click the top-right
Logicon. Log page help here.Scroll down on the log page and double-check that no table load failed, and the row count matches with the text tables. Following is an example highlighting two tables and their loaded row count.
